
What is TestSpeeder?
TestSpeeder (Test Speeder) is the title of adware and a potentially unwanted program that affects multiple internet browsers. Potential TestSpeeder malware and associated programs will collect user internet browser data, share the collected user data with third-parties, and will use the collected user data to generate ‘relevant’ and targeted advertisements to the user.

TestSpeeder is promoted as a free download used to check internet upload and download speeds, as well as monitor the speeds of your internet service provider. However, these programs are primarily utilized to promote sponsored products and display irrelevant and misleading advertisements.
If TestSpeeder is installed a computer and internet user may experience unwanted redirects to suspicious websites, including websites that claim to scan for and test internet speeds. Once the test is complete on the redirected website, the webpage will provide non-beneficial Windows Optimizer programs to the user.
Furthermore, if TestSpeeder is installed additional unwanted programs, including malware, may have bundled with this item. To remove TestSpeeder and stop unwanted symptoms from occurring it may be necessary to remove third-party programs and browser attachments.
How to remove TestSpeeder (Virus Removal)
- Automatic Removal Guide
- Manual Removal Guide
- For Tech Support – Call 1-888-879-0084 and we will kindly assist you with removing this computer infection.
1. Automatic Removal Guide
Use the instructions below to automatically remove TestSpeeder and third-party malware, as well as automatically remove unwanted search engines from your installed internet browsers.
Malwarebytes Anti-Malware
1. We highly recommend writing down the toll free number below in case you run into any issues or problems while following the instructions. Our techs will kindly assist you with any problems.
if you need help give us a call
2. Install the free or paid version of Malwarebytes Anti-Malware.


3. Once Malwarebytes is installed, run the program. *Malwarebytes may automatically begin to update and scan your computer at this point.

4. Once the Malwarebytes program has been open, if a scan has not initiated, please click the large Scan Now button or visit the “Scan” tab to initiate a scan. Before the scan is started Malwarebytes may ask to update the software, make sure to do so if prompted to.

5. Once the scan is complete, click the Quarantine All button to remove the files.

6. You may also chose to visit the History tab and click Delete All to remove these files from the Quarantine log, although these files no longer prove a threat.
CCleaner by Piriform
CCleaner can be used to automatically repair internet browser settings, system startup up settings, and uninstall unwanted software.
1. Install the free or paid version of CCleaner by Piriform.

2. Once installed, open the program and navigate to Cleaner > Windows/Applications and click the Analyze button. Afterwards, click the Run Cleaner button on the bottom right of the program interface.
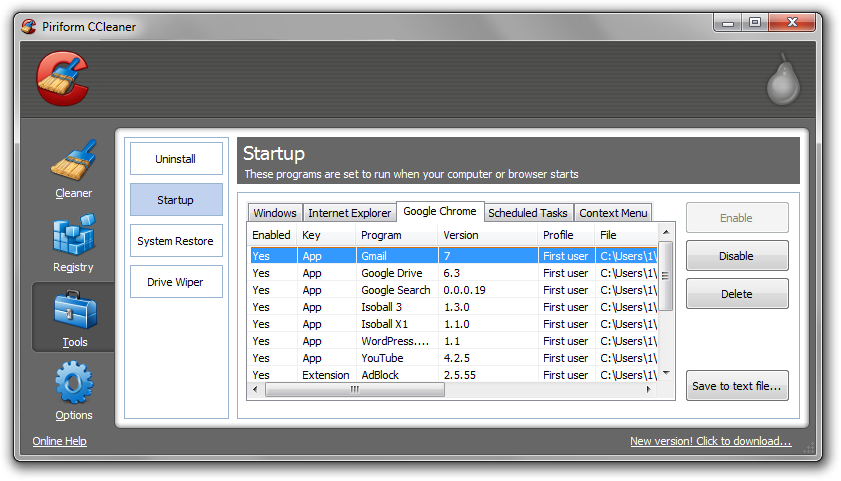
3. Next, navigate to Tools > Startup and search through each tab starting from windows, internet explorer, etc., all the way to Content Menu, for additional suspicious entries and click Disable and Delete once anything is found.
4. To automatically uninstall unwanted software, navigate to the Uninstall tab and search for the program in the list of installed programs. Uninstall the unwanted software as selected by clicking the Run Uninstaller button.
2. Manual Removal Guide
Use the instructions below to manually uninstall TestSpeeder adware from Microsoft Windows XP, Windows Vista, Windows 7, and Windows 8.
How to uninstall TestSpeeder
1. Access Windows Start Menu and navigate to the Control Panel (on Windows 8, right click the bottom left corner to gain access to the Windows 8 Start Menu. Windows 8 may also select ‘Programs and Features’).

2. From the Control Panel, click Uninstall a program or Add and remove a program in the Programs section.
3. Search for TestSpeeder in the list of installed programs. Once the adware is located, double click the unwanted program or select it with your mouse and click the Uninstall button. *Follow any instructions that may prompt to remove this program.
How to remove TestSpeeder add-ons and extensions
Use the instructions below to remove TestSpeeder add-ons and extensions from Chrome, Firefox, and Internet Explorer.
Google Chrome
1. Click on the Customize icon (wrench or 3 bar icon) next to the address bar and navigate to Tools > Extensions.
2. Search for the TestSpeeder extension and remove it by clicking the trashcan icon next to it.
Mozilla Firefox
1. Type Ctrl+Shift+A.
2. On the Extensions and Plugin search for the TestSpeeder add-on and remove it.
Microsoft Internet Explorer
1. Click Tools and select Manage add-ons.
2. On the Toolbars and Extensions tab search for the TestSpeeder add-on and remove it if located.
Leave a Comment